Securing your server is one of the most crucial steps in deploying any online service. This guide provides a detailed, step-by-step approach to hardening your Ubuntu server, transforming it from a default installation into a secure, production-ready environment. You’ll learn how to significantly minimize vulnerabilities and protect your data from common threats.
Pre-requisites
- A freshly installed Ubuntu Server (20.04 LTS or newer recommended).
- A stable internet connection.
- Basic familiarity with the Linux command line.
- Access to a terminal with administrative privileges (e.g., via
sudoor as the root user for initial setup).
🛡️ Ubuntu Server Hardening Guide for Maximum Security
Securing your Ubuntu server is paramount before deploying it in a production environment. This comprehensive guide outlines essential best practices for hardening your server, including robust SSH security, meticulous firewall configuration, stringent root access restrictions, efficient service management, and continuous system monitoring. Adhering to these steps will significantly minimize potential attack vectors and fortify your system’s defenses.
1️⃣ Update the System
Begin by updating your system to ensure you’re running the latest security patches and stable versions of all installed packages. This is a foundational step for any security strategy.
apt-get update
apt-get upgrade -y
The apt-get update command refreshes your package repository information, while apt-get upgrade -y installs all available updates, keeping your system current with vital security fixes.
2️⃣ Remove UFW (Uncomplicated Firewall)
If you intend to use Firewalld for firewall management, it’s crucial to remove UFW to prevent conflicts. Firewalld offers a more dynamic and modern approach to firewall configuration.
systemctl stop ufw
sudo ufw disable
sudo apt remove --purge ufw -y
sudo rm -rf /etc/ufw /lib/ufw
sudo rm -f /var/log/ufw.log
sudo apt autoremove -y
sudo apt update
These commands collectively stop UFW, disable its service, completely remove all associated files, and perform a thorough cleanup, ensuring no remnants of UFW remain on your system.
3️⃣ Install Essential Security and Monitoring Tools
Install a suite of critical security and monitoring tools to enhance your system’s protection and oversight capabilities. Key packages include:
- fail2ban: Automatically bans IP addresses exhibiting suspicious behavior, effectively thwarting brute-force attacks.
- telnet: A utility for testing network connectivity (use with caution, as it transmits data unencrypted).
- htop: A powerful, interactive process viewer for real-time system resource monitoring.
- net-tools: Provides legacy networking utilities like
netstatfor comprehensive network diagnostics. - firewalld: A robust and dynamic firewall management solution.
- openssl: An indispensable toolkit for managing SSL/TLS certificates and encrypted communications.
- unzip: A common utility for extracting content from
.ziparchive files.
apt-get install fail2ban telnet htop net-tools firewalld openssl unzip -y
This single command streamlines the installation of all these essential tools.
4️⃣ Create a Non-Root Admin User
Operating a server directly as the root user poses significant security risks. Always create a non-root user with sudo privileges for secure and routine system administration.
adduser sysadmin
usermod -aG sudo sysadmin
The first command creates the sysadmin user, and the second command grants this user administrative privileges by adding them to the sudo group.
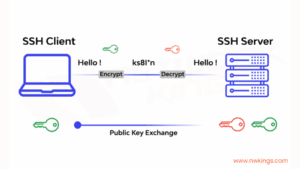
5️⃣ Enforce SSH Key Authentication Only
To significantly bolster SSH security, disable password-based logins entirely and mandate SSH key authentication. This crucial step eliminates the vulnerability to brute-force attacks targeting SSH passwords.
Edit the SSH daemon configuration file:
nano /etc/ssh/sshd_config
Set the following parameters to no:
PasswordAuthentication no
ChallengeResponseAuthentication no
UsePAM no
Next, add your public key to the administrative user’s ~/.ssh/authorized_keys file. Replace sysadmin with your chosen non-root username.
mkdir -p /home/sysadmin/.ssh
nano /home/sysadmin/.ssh/authorized_keys
chmod 700 /home/sysadmin/.ssh
chmod 600 /home/sysadmin/.ssh/authorized_keys
chown -R sysadmin:sysadmin /home/sysadmin/.ssh
Finally, restart the SSH service to apply the changes:
systemctl restart ssh
6️⃣ Disable Root SSH Access
Disabling direct root login over SSH is a critical security measure that significantly reduces your server’s attack surface. By preventing access to the most privileged account, you thwart common attack strategies.
Edit the SSH configuration file once more:
nano /etc/ssh/sshd_config
Set the following parameter:
PermitRootLogin no
Then, restart SSH to implement the change:
systemctl restart ssh
7️⃣ Lock Root User
Further secure your server by locking the root account. This action prevents any login attempts as root, whether local or remote, adding another layer of defense.
passwd -l root
usermod -s /sbin/nologin root
The first command locks the root password, effectively disabling direct password-based login. The second command sets the root user’s shell to /sbin/nologin, preventing interactive root login via any means.
8️⃣ Set Default Boot Target to Multi-User (CLI)
For server environments that do not require a graphical user interface (GUI), configure the system to boot into multi-user mode (CLI only). This enhances security by reducing unnecessary processes and improves performance.
systemctl set-default multi-user.target
9️⃣ Configure Firewalld
Leverage Firewalld to establish precise rules that permit only essential inbound and outbound network traffic. By default, implement a restrictive policy: block all incoming connections and explicitly allow only required services like HTTP (port 80) and HTTPS (port 443).
# Allow essential inbound services (SSH, HTTP, HTTPS)
sudo firewall-cmd --permanent --add-service=ssh
sudo firewall-cmd --permanent --add-service=http
sudo firewall-cmd --permanent --add-service=https

# Allow outbound traffic for established and related connections (essential for server communication)
sudo firewall-cmd --permanent --direct --add-rule ipv4 filter OUTPUT 0 -m conntrack --ctstate ESTABLISHED,RELATED -j ACCEPT

# Explicitly allow outgoing HTTP and HTTPS requests (for fetching updates, connecting to external services)
sudo firewall-cmd --permanent --direct --add-rule ipv4 filter OUTPUT 1 -p tcp --dport 80 -j ACCEPT
sudo firewall-cmd --permanent --direct --add-rule ipv4 filter OUTPUT 2 -p tcp --dport 443 -j ACCEPT

# Block all other outbound traffic by default (strict egress filtering)
sudo firewall-cmd --permanent --direct --add-rule ipv4 filter OUTPUT 3 -j DROP

# Apply all configured rules immediately
sudo firewall-cmd --reload
🔟 Verify Firewall and Port Status
After configuring your firewall, it’s crucial to verify its operational status and confirm that all rules have been correctly applied.
# Check if firewalld is actively running
sudo firewall-cmd --state

# List all allowed services and ports in the default zone
sudo firewall-cmd --list-all

# Display custom direct rules that have been added
sudo firewall-cmd --direct --get-all-rules

1️⃣1️⃣ Check Open Ports
Understanding which ports are open and which services are listening on your server is vital for security auditing. This ensures that only necessary services are exposed to the network.
# Modern approach using ss (Socket Statistics)
sudo ss -tuln

# Traditional method using netstat (Network Statistics)
sudo netstat -tuln
1️⃣2️⃣ Monitor SUDOers Group
Regularly monitor users with administrative access, particularly those granted sudo privileges. Ensuring that only authorized personnel possess administrative capabilities is a cornerstone of system security.
# View users with ALL sudo privileges configured directly in /etc/sudoers (less common for direct edits)
cat /etc/sudoers | grep ALL

# Check members of the 'sudo' group (standard practice on Ubuntu for sudoers)
cat /etc/group | grep sudo
1️⃣3️⃣ List Active Listening Services
Listing active services helps identify potential vulnerabilities by revealing which applications are actively listening for incoming connections on the network.
# Shows active listening TCP/UDP ports along with the associated processes and their PIDs
netstat -plntu
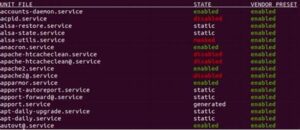
1️⃣4️⃣ Restrict Auto-Run Programs and Services
Minimize unnecessary auto-starting services and daemon processes to reduce the potential attack surface and enhance system performance. Review services that launch at boot and disable those not strictly required.
# Example: Disable shell access for a specific service user (if applicable)
usermod -s /sbin/nologin [username]

# To list all enabled services (for monitoring and potential disabling)
systemctl list-unit-files --type=service --state=enabled
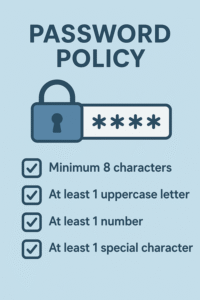
1️⃣5️⃣ Enforce a Strong Password Policy
Implement a robust password policy to secure user access to the server. This includes setting minimum password length, defining an expiration policy, and preventing the reuse of old passwords.
These configurations are typically managed through /etc/login.defs for system-wide defaults and by configuring pam_pwquality.so within the /etc/pam.d/common-password file for advanced password quality requirements.
Key Takeaways
Fortifying your Ubuntu server is an indispensable prerequisite before deploying any production service. By meticulously implementing the hardening practices detailed in this guide, you can drastically reduce your server’s attack surface and significantly enhance its resilience against potential threats. Remember, ongoing security is not a one-time task; regularly auditing your configurations, staying informed about new vulnerabilities, and diligently keeping your software updated are crucial for maintaining a high level of security.
Views: 448