🛡️ Ubuntu Server Hardening Guide for Maximum Security
Securing your Ubuntu server is critical before deploying it in a production environment. This guide covers essential best practices for hardening your server, including securing SSH, configuring firewalls, restricting root access, managing services, and ensuring system monitoring. Following these steps will significantly reduce potential attack vectors.
1️⃣ Update the System
Always begin by updating your system to ensure you’re running the latest security patches and stable versions of packages. This is an essential first step in maintaining system security.
apt-get update
apt-get upgrade -y
The `apt-get update` command updates the package repository information, while `apt-get upgrade -y` installs the available updates for all installed packages. This ensures your system is up-to-date with the latest security patches.
—
2️⃣ Remove UFW (Uncomplicated Firewall)
If you plan on using firewalld for firewall management, it’s best to remove UFW (Uncomplicated Firewall) to avoid conflicts. Firewalld provides a more flexible and modern approach to firewall management.
systemctl stop ufw
sudo ufw disable
sudo apt remove --purge ufw -y
sudo rm -rf /etc/ufw /lib/ufw
sudo rm -f /var/log/ufw.log
sudo apt autoremove -y
sudo apt update
The above commands stop UFW, disable it, remove all associated files, and perform a cleanup to ensure that UFW is fully removed from your system.
—
3️⃣ Install Essential Security and Monitoring Tools
Installing essential security tools helps protect and monitor your system. Below are some key packages:
- fail2ban: Prevents brute-force attacks by banning IP addresses that show signs of malicious activity.
- telnet: Useful for testing network connectivity.
- htop: A system monitoring tool that provides real-time statistics about system processes and resource usage.
- net-tools: Includes legacy tools like
netstatfor network monitoring. - firewalld: A dynamic firewall manager.
- openssl: For creating and managing SSL certificates.
- unzip: Utility for extracting `.zip` files.
apt-get install fail2ban telnet htop net-tools firewalld openssl unzip -yThe above command installs all of these tools in one go.
—
4️⃣ Create a Non-Root Admin User
Running a server as the root user is risky. It’s better to create a non-root user with sudo privileges to manage the system securely.
adduser sysadmin
usermod -aG sudo sysadmin
Here, sysadmin is a newly created user, and the usermod -aG sudo sysadmin command grants this user administrative privileges.
—
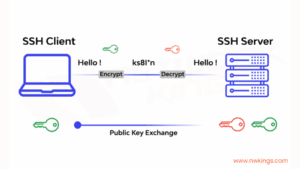
5️⃣ Enforce SSH Key Authentication Only
To enhance security, disable password-based logins for SSH and require SSH key authentication only. This eliminates the risk of brute-force attacks targeting SSH passwords.
Edit the SSH configuration file:
nano /etc/ssh/sshd_configSet the following parameters:
PasswordAuthentication no
ChallengeResponseAuthentication no
UsePAM no
Then, add your public key to the user’s ~/.ssh/authorized_keys file:
mkdir -p /home/sysadmin/.ssh
nano /home/sysadmin/.ssh/authorized_keys
chmod 700 /home/sysadmin/.ssh
chmod 600 /home/sysadmin/.ssh/authorized_keys
chown -R sysadmin:sysadmin /home/sysadmin/.ssh
Finally, restart SSH to apply the changes:
systemctl restart sshThis ensures only users with the correct private key can authenticate.
6️⃣ Disable Root SSH Access
Disabling root login over SSH is a critical step to reduce the attack surface. By preventing root SSH access, attackers can’t easily target the most privileged account.
Edit the SSH configuration file again:
nano /etc/ssh/sshd_configSet the following:
PermitRootLogin noThen, restart SSH for the changes to take effect:
systemctl restart ssh—
7️⃣ Lock Root User
To further secure the system, lock the root account to prevent login attempts. This is especially useful if you want to ensure that no one can log in as root, either locally or remotely.
passwd -l root
usermod -s /sbin/nologin root
The first command locks the root password, and the second sets the root shell to /sbin/nologin, which prevents root from logging in.
—
8️⃣ Set Default Boot Target to Multi-User (CLI)
If you’re not using a graphical user interface (GUI) on your server, configure the server to boot in multi-user mode (CLI only). This reduces the attack surface and improves system performance.
systemctl set-default runlevel3—
9️⃣ Configure Firewalld
Use firewalld to create rules that allow only necessary inbound and outbound traffic. By default, block all inbound traffic and allow only specific ports, such as HTTP (80) and HTTPS (443).
# Allow basic HTTP and HTTPS services
sudo firewall-cmd --permanent --add-service=ssh
sudo firewall-cmd --permanent --add-service=http
sudo firewall-cmd --permanent --add-service=https

# Allow outbound established and related traffic
sudo firewall-cmd --permanent --direct --add-rule ipv4 filter OUTPUT 0 -m conntrack --ctstate ESTABLISHED,RELATED -j ACCEPT

# Allow outgoing HTTP and HTTPS requests
sudo firewall-cmd --permanent --direct --add-rule ipv4 filter OUTPUT 1 -p tcp --dport 80 -j ACCEPT
sudo firewall-cmd --permanent --direct --add-rule ipv4 filter OUTPUT 2 -p tcp --dport 443 -j ACCEPT

# Block all other outbound traffic
sudo firewall-cmd --permanent --direct --add-rule ipv4 filter OUTPUT 3 -j DROP

# Apply all rules
sudo firewall-cmd --reload
The above configuration creates rules for SSH, HTTP, and HTTPS traffic and restricts outbound traffic to only established or related connections.
—
🔟 Verify Firewall and Port Status
After configuring the firewall, it’s important to verify that it’s working correctly and the rules are applied.
# Check if firewalld is active
sudo firewall-cmd --state

# List allowed services and ports
sudo firewall-cmd --list-all

# Show custom direct rules
sudo firewall-cmd --direct --get-all-rules
1️⃣1️⃣ Check Open Ports
It’s essential to know which ports are open and which services are running on your server. This will help you ensure that only necessary services are exposed to the network.
# Modern way using ss
sudo ss -tuln

# Traditional method with netstat
sudo netstat -tuln
Both commands will provide a list of active network connections and open ports on the system.
—
1️⃣2️⃣ Monitoring WHEEL Group
By default, the `wheel` group is used to grant users administrative access via sudo. Monitoring which users belong to this group is crucial for maintaining control over who has administrative privileges.
# View users with ALL sudo privileges
cat /etc/sudoers | grep ALL

# Check members of the 'wheel' group
cat /etc/group | grep wheel
By checking the members of the `wheel` group, you can ensure that only authorized users have administrative access.
—
1️⃣3️⃣ List Active Listening Services
Listing active services listening on ports helps identify potential vulnerabilities by showing which applications are open to the network.
# Shows active listening TCP/UDP ports with associated processes
netstat -plntu
Running the command will provide detailed information about listening ports and which processes are bound to them.
1️⃣4️⃣ Monitor Auto-Run Programs
Minimize unnecessary auto-start services to reduce the attack surface and improve system performance. Ensure that services are running under their specific user accounts and not root.
# Disable shell access for a service user
usermod -s /sbin/nologin
—
1️⃣5️⃣ Password Policy
A strong password policy is essential for securing access to the server. Enforce a minimum password length, expiration policy, and prevent password reuse.
This can be configured through the /etc/login.defs file or pam_pwquality.so in the /etc/pam.d/common-password file.

1️⃣6️⃣ Kernel Update (Requires QA Testing)
Apply kernel security patches promptly without rebooting the system. KernelCare can patch the running kernel without needing a system restart, but it should be tested thoroughly in a staging environment first.
# Check current kernel version
uname -vr
Always test kernel updates in a staging environment before applying them in production.
—
1️⃣7️⃣ Enable SELinux (Requires QA Testing)
SELinux (Security-Enhanced Linux) provides an additional layer of security by enforcing Mandatory Access Control (MAC). SELinux can restrict what processes and users can access, even if an attacker gains root privileges.
nano /etc/selinux/config

# Set the following line:
SELINUX=disabled   # or 'enforcing' for active protection
Remember to test SELinux configurations thoroughly to ensure they do not break your applications.

✅ Final Thoughts
Server hardening is an ongoing process that requires regular audits and updates. Follow these steps to secure your server and reduce potential attack vectors. Continuously monitor, update, and review your system to maintain a secure environment.
—
🎯 Conclusion
By following these hardening practices, you’ll enhance the security of your Ubuntu server. From configuring firewalls and SSH security to managing root access and services, you’re taking important steps to safeguard your system. Always remain vigilant and regularly audit your server’s security posture.
Leave a Reply